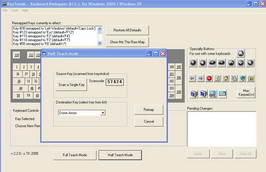
So now I had a keyboard that returned unique codes for all of it’s keys (although the wrong codes but each key had it’s own code now) what more could I want? OH.. I still need to remap the keys in XP to actually be able to use the keyboard. It took a few hours but I found a freeware application called KeyTweak which allowed the swapping of keys but not quite the comfortable way for a project like this. What I needed was for the software to capture the code of the key I’m pressing then offer me up a list of keys from which I can select the right one. And so I emailed the programmer telling him what I had in mind. About a day later a new version of KeyTweak was released containing the “Half Teach Mode” EXCELLENT!
I went on to reconfigure the keymap and a few minutes later I had a completely functional notebook keyboard. (well okay not completely.. the Fn key and such never really worked all that good.. I used 3 separate applications to get them working and they still had problems so I decided to drop the idea.)

January 9th, 2006 at 21:32
Grreat!have a keyboard from a rip-off of your walltop-project laying around… #thinking#
oh, remember, that project isn’t finished ¤śÉ getting very stuck now when I need to make some custom cables some connectors called kx- (number of contacts) series. (also some other letters to the name, verifying some variables like height, and blah blah)
but point is, theese connectors aren’t sold in pacages of less than 100 pcs
anyway, what about making an mice working out of laptop- parts?
January 10th, 2006 at 1:51
Got the trackball working
http://leechar.5gigs.com
January 11th, 2006 at 20:58
Why wouldn’t you put a link to keytweak?
January 11th, 2006 at 21:41
Or you could just go to http://www.motioncomputing.com and buy a usb laptop keyboard with touchpad and all…
January 12th, 2006 at 3:33
you could try using Autohotkey (autohotkey.com) – a pretty powerful hotkey scripting language – to get the Fn key working. You could have also used it to remap the keyboard but then you would have to keep it in memory.
January 12th, 2006 at 8:38
Heero: But it’s so much more fun to do it yourself!
January 12th, 2006 at 13:47
Heero, obviously you dont get it. =) Yea going out and buy one would be easier, but you never know what your capible of and you never learn anything new unless you mod it yourself.
Leechar this is a totally kickass mod, I love it.
LostLegend
January 12th, 2006 at 14:04
Now if someone would just come up with a way to hook up a keyboard to my PSP
Lots of talk so far but nothing that works. The software seems to be the problem.
Sony is so set on no one making a nickle on that device but themselves that they
seem to have made it as hack/mod proof as possible. so i gave mine to my grandson.
January 13th, 2006 at 20:40
Very cool. Now, do you think you could expand this to create a KVM from an old laptop?
January 16th, 2006 at 18:22
Great and genial project!
But, does anybody knows how to build an encoder (I need the schematics and PIC code if used)
for a notebook keyboard matrix ?
I was planning to use in DOS too… actually was planning in using in my MAME cab PC…
February 17th, 2006 at 3:16
Hai guys, I’m completely new with these things, but I have a problem, the cable that comes out off the laptop keyboard has 2 wires that are broken, I tried to solder them
but because it is basicaly plastic with a veryt thing metal layer inside it is impossible to solder it just burns. Does any of you guys an idea how to fix this? also if
I would cut of the piece that is damaged the cable would still be long enough(it is near to the end). but can I just cut that of and put it back in the connector?
Thanks in advance,
Thomson
March 6th, 2006 at 10:42
Thomson, check this out http://www.hackaday.com/entry/1234000800056067/ . It looks tricky, but might work out.
September 5th, 2006 at 12:57
hey.. can you tell me the steps and wut i need to put my old NEC Laptops keywork working on the PC??
it doesnt matter if the keys are wrong.. i figure it that my self… but how to do all the electronic
wireing and soldering.. ??
April 25th, 2007 at 8:28
I have a question about the AT keyboard controller pcb. Did u make that from scratch or did u buy one/a kit from a store?
July 6th, 2007 at 7:46
The controller has to have the same amount of pins??
That would be a matter of great luck, i already stripped 3 keyboards and none of them has the 24 pins i need :-((
August 6th, 2007 at 0:33
I am trying to figure out how to throw my old alienware’s touchpad onto my desktop. I actually like the touchpad and the AW is amazingly dead, but for the life of me I can’t find the connector’s configuration.
October 17th, 2007 at 3:46
Hi, if there is 24 pins, i think there is not included the keyboard LIGHTS wich takes 6 more pins? totally 30 pins in normal keyboard with lights? laptop keyboard 24pins without lights? am i wrong?
October 17th, 2007 at 15:28
You can also buy an “adapter” called FFC/FPC connector to transfer flat cable to pins ¤śē
November 19th, 2007 at 12:27
Very cool, I was just about to embark on my own walltop project (with a twist!), and was thinking about what to do with the touchpad and keyboard… any idea about the feasibility of implementing wireless functionality into this (powered by AAs, possibly)?
January 21st, 2008 at 10:11
do you think you could expand this to create a KVM from an old laptop?
March 9th, 2008 at 6:28
I have the same looking laptop keyboard than you have(ripped from compaq contura). It is with finnish layout(├ā┬ż,├ā┬ź,├ā┬Č) and so is that at-keyboard where i ripped the controller. In that notebook keyboard there is two mylar cables, which have 14 pins in another and 12 pins in another. But in my at-keyboard there is 14 pins in another connector and 8 in another. Did you have the same situation and what should i do? Should i leave 4 pins unplugged from that mylar cable with 12 pins? And what 4 pins should be unplugged?
Advice is appreciated.
ps. sorry my bad english.
June 11th, 2008 at 7:15
Neat project! But, why a laptop keyboard? What’s so great about them?
July 10th, 2008 at 7:12
Wow, this is pretty cool. Would have been great if you could get that FN key to work ├óŌé¼ŌĆ£ it’s a bit of a bugger. If you tried again you may find something new that can help you do that. Would have been cool if you could have put the keyboard into a case and then you would have had a really cool external laptop keyboard. There’s something cool about doing these kinds of things at home ├óŌé¼ŌĆ£ really, well done!
August 7th, 2008 at 9:22
Cheers to your resourcefulness and craftsmanship! Who would even think that there├óŌé¼Ōäós something else that can be made out of refurbished keyboards? So, what├óŌé¼Ōäós next ├óŌé¼ŌĆ£ the monitor?
September 25th, 2008 at 19:04
If you’re willing to spend about $40 on a keyboard encoder, you could do a lot worse than the I-Pac:
http://www.ultimarc.com/ipac1.html
December 7th, 2008 at 23:34
Cool Hack. I have a busted Sony Vaio laptop. The keyboard is sealed and has a 24 pin ribbon cable coming out. I was wondering if I could convert it into a USB keyboard using a USB controller, but the problem is that I have no idea how to do it. Could you please point me in the right direction?
February 11th, 2009 at 20:07
great! for the fn keys…try linux
January 12th, 2010 at 14:47
does that program by any chance save onto the keyboard what it is. I want to make a keyboard like this for a project, but owuld need the key board to remember the keys
January 21st, 2010 at 14:43
Hi, quite cool hack!
I had an idea for a related project and it brought me here. Last year came into my hands a 2006 monitor-crashed MacBook and I’ve been using it for spare parts ever since as I own an equal one myself. Yesterday I dissected the last of it and had the idea to use that remarkable keyboard on my desktop, and maybe imbue it on the secretary itself.
But I’m totally at a loss on how to make the connection. The keyboard is attached to the mouse and they both output a 10-pin cable. If I sever this connection I get a very slim 26 pin ribbon cable.
Does anyone have any idea that could help me? I could post further info if you’re interested
Greetings!
February 16th, 2010 at 0:51
Interesting findings. Thanks for sharing the work.
July 22nd, 2010 at 12:33
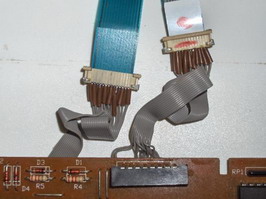
what are the cables in pic 3 page 1 called?